Polytunnel Part 9 - The Final Push
Hello and welcome to part 9 (the final part you'll probably be glad to hear) of my polytunnel build series of posts. Since the start of this project, I've blogged about the different stages of the build, and by the end of the last post, we had the main structure up, covered and all tensioned so the cover was as tight as we could get it. But we had left an apron of polythene all around the tunnel and with strong winds in the forecast, there were still a few odds and ends to do before we could finally say job well done.
When a tunnel from First Tunnels (or any other polytunnels for that matter) is built, there are several options available for fixing the polythene into place. Essentially, the cover is fixed to a rail of some sort or trenched and buried into the ground around the outside of the tunnel. In our case, we chose a base rail option to which the polythene was attached and tensioned, but in order to prevent wind getting under the base rail and potentially adding lift causing damage, we decided to also add the trench and bury method.
First thing though was to trim off some of the spare cover. If we were only burying the polythene, without using the base rail, we would have needed to dig a trench around 40 to 50cm deep all around the structure and bury the whole polythene skirt. But, given we had a base rail holding the cover in place, I chose only to bury about 40cm of polythene, so only went down one spade depth.

I worked around the edges, digging the trench, dropping in the left over polythene and then backfilling.


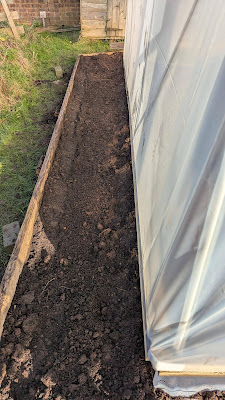
The digging and the back filling didn't actually take as long as I thought it would. The amount of wet weather that we have had has certainly softened the ground up which helped. So, having some spare time, I decided to put it to good use and started some work on the inside of the tunnel. Originally, I planned for two beds running down the length of the tunnel, but a last minute change of plan meant that I've gone with one bed running the full length and the other bed running most of the length. The idea being that at the moment, the doors open inwards, and having the one bed shorter means that the main/front door can open fully.

As we start to use the tunnel more, I may decide to change the main front door so that it opens outwards instead, in which case the left bed can be extended to run the full length. I already had the edging timber on the plot from when we put in other beds to make the beds, and the pegs were made from left over battens from the tunnel build.
I'm now going to call this job done in terms of the tunnel build, but there are a few other things that I'll be adding in the coming weeks. My plans for the tunnel aside from all the usual sowing and growing on will be for growing chilli peppers, tomatoes and aubergines in the first year. I'm also going to be sourcing some woodchip for the pathway and area behind the door, so I'll cut some membrane to size to lay underneath the wood chip before adding that in place. Even though I have added digestate to the beds, for the first year, I won't be planting direct into the ground. I'm going to cover the beds with membrane and leave the worms do their thing and start working the organic matter down into the ground. My growing within the tunnel for year one will be done entirely in quad grows and other containers, so there's no massive rush to get anything in the ground. Let's give the soil chance to recover and to settle after a great deal of disruption during the build phase.
In addition to these things, over the build and during the general development of both parts of the allotments plot, I've amassed a nice collection of spare timber, so I will be putting this to good use in the form of building some suspended staging shelves to hang from the crop bars. All that to come.
So, until next time, thanks for sticking with me during the tunnel build series and come back for more allotment madness!